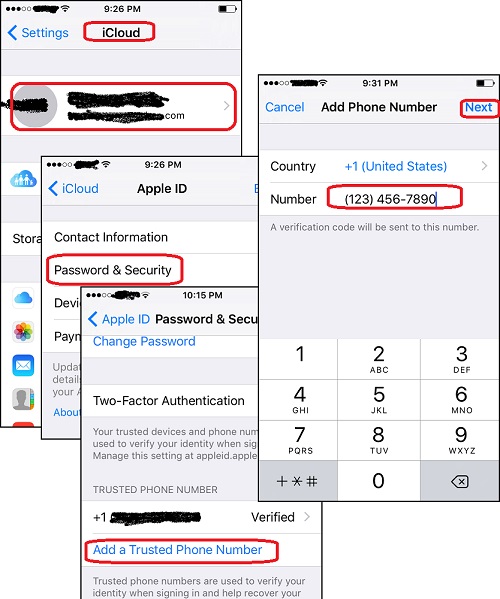
In this age of digital supremacy, it is more important than ever to keep your online accounts safe. Apple, an industry leader in user security and privacy, offers a reliable method to keep your Apple ID safe. One key part of this protection is adding trusted phone numbers to your Apple ID. The double benefits of this are increased security and easier account recovery in the event of a forgotten password or other authentication problem.
In this detailed tutorial, you’ll learn how to verify your phone numbers on your Apple ID. The procedure is simplified and straightforward, regardless of whether you’re using a computer, iPad, or iPhone.
Why Add Trusted Phone Numbers?
Before we get into the specifics, let’s talk about why verifying your phone numbers is so important for your Apple ID.
Enhanced Security:
Adding verified phone numbers gives your Apple ID an extra layer of protection. Only approved users will be able to make modifications to your account.
Account Recovery:
Having reliable contact numbers associated with your Apple ID makes recovering your account easier in the event you forget your password or experience problems with two-factor authentication.
Verification for Two-Factor Authentication:
Two-factor authentication, which requires a verification code to be delivered to your trusted devices or phone numbers, adds an extra layer of security.
Let’s get into the specifics of verifying your phone numbers using Apple ID.
How to Add Trusted Phone Numbers to Apple Id
For iPhone or iPad:
- Open Settings:
- Unlock your iPhone or iPad and go to the “Settings” app. It’s typically represented by a gear icon.
- Tap on Your Apple ID:
- Scroll down and tap on your Apple ID, which is usually located at the top of the Settings menu.
- Password & Security:
- In the Apple ID menu, select “Password & Security.” This is where you manage your account security settings.
- Add Trusted Phone Number:
- Under the “Security” section, tap on “Edit” next to the “Trusted Phone Numbers” option.
- Verify Your Identity:
- You might be prompted to enter your Apple ID password or use Touch ID/Face ID to verify your identity.
- Add a Trusted Phone Number:
- Tap on “Add a Trusted Phone Number” and enter the phone number you want to add. Make sure it’s a number you have access to.
- Verify the New Number:
- Apple will send a verification code to the newly added phone number. Enter the code to verify and add the number to your trusted list.
- Confirmation:
- Once verified, you’ll see the newly added phone number listed under “Trusted Phone Numbers.”
For Mac or PC:
- Open System Preferences (Mac) or Control Panel (PC):
- On a Mac, click the Apple logo in the top-left corner and select “System Preferences.” On a PC, open the Control Panel.
- Apple ID (Mac) or iCloud (PC):
- If you’re using a Mac, click on “Apple ID” in System Preferences. For a PC, click on “iCloud” in the Control Panel.
- Password & Security:
- On a Mac, click on “Password & Security.” On a PC, select “Account Details.”
- Add Trusted Phone Number:
- Look for an option related to security settings, and find “Trusted Phone Numbers” or a similar option. Click on “Edit” or “Add a Trusted Phone Number.”
- Verify Your Identity:
- Similar to the process on iOS devices, you might need to enter your Apple ID password or use any additional security measures.
- Add a Trusted Phone Number:
- Enter the phone number you want to add and follow the on-screen instructions to verify the number.
- Confirmation:
- Once the verification is successful, you should see the new phone number listed under “Trusted Phone Numbers.”
Tips and Best Practices:
Use Different Types of Numbers:
It’s a good idea to have both a mobile and a fixed phone number listed as emergency contacts.
Regularly Review Trusted Numbers:
You should check and update your list of reliable contacts on a regular basis to make sure it has the most up-to-date information.
Secure Your Apple ID Password:
While adding verified phone numbers is helpful, it’s just as important to keep your Apple ID password secure and unique.
Be Cautious with Two-Factor Authentication:
You should exercise caution whenever logging in from an untrusted place or device if you employ two-factor authentication. Verify any unanticipated login attempts immediately.
Conclusion:
Protecting your digital life requires taking precautions, and adding trusted phone numbers to your Apple ID is an important part of this. The procedure is simple and can greatly improve the security of your Apple ID regardless of whether you are using an iPhone, iPad, Mac, or PC.
If you follow the detailed instructions in this article and implement the best practices mentioned, you can keep your Apple ID safe and recover your account in the event of a hack. Keep in mind that avoiding future problems requires taking preventative action today.


quo et deserunt et accusantium dolor enim quo sit. tempora enim architecto voluptatem fugit aut iusto. expedita optio perspiciatis qui illum velit non tempore repellat. expedita qui quaerat perspiciat